Know How... 100 (Transcript)
On this episode of Know How your embedded devices can be hacked, so protect them. Also our remote control build continues with Power Plan. And did you know that your future fuel cells are going to smell like cat piss? That’s right. It’s all next on Know How.
Bandwidth for Know How is brought to you by cachefly.com.
Father Robert Ballecer: Welcome to Know How. It is the Twit show where we build, bend, break and upgrade. I’m Father Robert Ballecer, the digital Jesuit. And unfortunately, I’m not joined by regular host, Cranky Hippo, Bryan Burnett. He and Alex Gumpel who is normally my TD, they are both at a marriage together. We want to wish them all the best. Please tweet out to them at Cranky_Hippo and Anelf3. Many years of happiness to come. There we go. Childhood friends, made good.
Fr. Robert: Now, let’s get right to it. A couple of weeks ago, some folks were talking to me about alternate ways of storing power. Now we’ve always been talking about battery power, increasing battery efficiency by dumping carbon nano tubes into the chemistry but one of the most promising technologies is the technology that is within our grasp is the hydrogen fuel cell. I know we’ve heard a lot about this, but the problem with the hydrogen fuel cell has always been storage and transportation of hydrogen. Hydrogen, as you know, tends to be kind of explosive - and we don’t like explosives, we like things to be safe. Especially when you’re are fueling vehicles. Hydrogen can be a difficult tool to bear. Some researches in the UK have figured out a way to make hydrogen on demand while also making it very transportable, very safe and therefore very cost effective. Now how do they do it? They do it by not using hydrogen. Yeah, that is right. They use hydrogen and they make it safe by not letting it be hydrogen. Free hydrogen - that is H2, at any given moment. They have developed a process by which they can take ammonia, which is just NH3, one atom of nitrogen and 3 atoms of hydrogen. And break is apart on demand so that for every two molecules of ammonia you get one molecule of nitrogen and 3 molecules of hydrogen. The ramifications for this are absolutely fantastic. First, ammonia is stable. It doesn’t smell great, it does smell a little bit like catfish, but it won’t blow up. By itself. The molecular ammonia, as long as it is pure, is going to be relatively easy to transport, relatively safe to store, and very easy to fill. In fact, you fill it just like you would fill the car of your petrol power vehicle right now. You use a plastic tank and dump ammonia into it and then it gets pumped over a catalyzer which would break apart the hydrogen from the nitrogen, thus giving you your hydrogen. Now the reason why they are able to do this is that the breakthrough that they made wasn’t the ability to crack apart ammonia, in fact we’ve been cracking apart ammonia for many years. The breakthrough was that they figured out a way to do it without a metallic catalyst. That has been the limiting factor. Those catalysts tend to be expensive. Very, very expensive. And so they have created a reactor. It is about the size of a 2L bottle that will do all the cracking with a simple chemical process. Chemicals that are catalysts themselves, not using any metal, not using any precious oars, not using anything that is expensive or difficult to replace. This is a breakthrough. What does this all mean? Okay, first of all it means that now we’ve got a way to fill in that last mile, that part of the hydrogen fuel cell economy that we thought was too dangerous. It also means that devices like this, this is actually a fuel cell itself, this is a reactor. This takes hydrogen, pure hydrogen, through this inlet and it gives you power. In fact, five volts of power one amp. Enough to charge USB devices. You stack enough of these together and you now have enough power to drive a car. Or a bus, a house, or a city. Previously we’d had to use things like this. This is just silicate, so this takes a little bit of water and it starts to cracking it apart and it releases ammonia, but this only works for a while. If I now had a way to safely store hydrogen to sequestered it away into the chemical bonds of ammonia, then it means I could drive more of these without worrying about exploding. Now, we don’t know exactly how the reactor works. That is kind of a black box. I’m sure there is the worry that people are going to try to copy them but we can guess as to how the reaction is going to work. What you see is you need to start with water. And you have to be able to crack the water apart. You need to pull H2O, which is 2 atoms of hydrogen and 1 atom of oxygen, and pull it apart. Typically we do this through electrolysis, by running power through water we get hydrogen on one side, we get oxygen on the other. Now with that free hydrogen and that free oxygen after you’ve split it apart, you combine it with nitrogen. Nitrogen is found all over our atmosphere. You use it process by which you combine hydrogen and nitrogen in a high pressure container, you run it over a catalyst and over time it will turn into liquid nitrogen. It is endothermic reaction, in other words energy has to go in to form a compound. Now once we are done with it that ammonia it is very, very stable. You can transported anywhere until you need to convert it back into hydrogen. Into two that you run it through a catalyst or through their reactor and you get nitrogen free and you get hydrogen so when it runs to the fuel cell all you get is heat, power and water. It is a fantastic way to close the power, to close the power loop and I don’t know, to make us a little greener.
Fr. Robert: Now let’s put a way our energy for a while and talk little bit about doge. This is an interesting story that popped up a few weeks back. Talking about how some devices had gotten hacked, allowing a hacker, a malicious hacker, to use their NAS’s, their Synology NAS’s to hack doge coins. Now Synology admits that they got hacked. This is the story. Earlier this year owners of Synology network attached storage boxes, they notices that there NAS’s were getting sluggish with abnormally high CPU usage. After a little research it was found that the boxes had been infected with malware that installed itself into a folder label that was owned. Now this malware was using the processing power of this technology box. Which is actually quite powerful. These boxes contained dual core atom CPUs, that have at least a gigabyte of memory. So in parallel compromising tens of thousands and hundreds of thousands of these boxes they actually got a decent amount of power. In fact, enough power to mine about 500 million doge coin. Which is actually about the equivalent of $620,000. That is not the story. The story is this, Synology found this vulnerability back in September 2013. They released a patch that close the vulnerability in their Lenux based manager operating system on September 23rd, just a few days later. And they made the patch a part of their next major operating system. But, it was only in February of this year that report started rolling in of people complaining about the sluggish performance. This is a Synology box. This is a 713+. This is one of the boxes that I use. I actually have quite a few of these. It is a two bay device. now the nice thing about this is that it has the ability to automatically download updates and tell you when they are available. Unfortunately, people didn’t do that. Which is why I want to show you believe quickly how much time it takes to enable it. Go ahead and upload that video. It shows you the update process that I made to a 713 that was inside of an IO safe enclosure. this allows you, really easily, to just check this box and it will download updates regularly. Then you just click the update now button and everything will take care of itself. What just baffles my mind is that with a process that is so easy, so automatic and so simple, that people are not doing it. Folks if you’ve got a Synology product right now go ahead and run the update. You’ll even get this brand-new disk Station manager which looks a little nicer and has a few more features, and is definitely more secure. So, if you are on a NAS, if you have one in your lab, in your office or your home, be it from Synology, NetGear or or even if it is not a NAS, if it is a router, if it is a device hooked up to your network I am going to make a plea to you to please, please make sure you go through regular updating. Go ahead and find out whatever you need to do to login, to check to see if there is a new firmware, and update it. Because when you do you are going to be able to get rid of things like, I don’t know making someone else a lot of doge coin.
Fr. Robert: Now when we come back we are going to get to the meat of the show. I want to show you all about the RC build that we have been talking about. Last time we showed you what the transmitters look like, we showed you how they actually work and how you can transmit instructions from one point to the other. Now, we are going to show you how you turn that instruction into power. But until then, let’s take a trip to Maker Faire.
Fr. Robert: If you have been to enough of the shows, you have probably seen cyberpunk. It is dark, it is pretty and most of the time it is beautiful. But what exactly makes cyberpunk and how do you make these beautiful pieces of costume? I am here with Trevor from Subverse Industries and he is going to tell us what is steam punk.
Trevor: Well steam punk is sort of reimagining of modern art, technology and culture. But through the lens of Victorian era aesthetic and culture.
Fr. Robert: Steam punk is such a wonderful combination of Retro futuristic, with laser guns with steamed cannons and holsters made out of leather. Now it is almost the style that people cannot describe, but they know it the minute they see it.
Trevor: Right, that is the beautiful thing about steam punk. It is so collaborative. There are so many right ways to do it. If you are a taker you can make something that it is steam punk and it is instantly recognizable as steam punk. You can come at it from the fashion angle, from all the literature, the novels out there and it is such a robust world. It is an amazing collaboration.
Fr. Robert: Trevor I’ve got to ask you about your collection behind you because everything behind us is handmade, designed by you and your team. And I have to say I have seen some bad steam punk in my days. Good attempts but not quite there. How do you go about actually designing the holsters and the hats and all the accoutrements that make your style?
Trevor: Well I’ve got to give credit to my community. Im inspired by the people around me all the time. Beautiful characters in the whole Bay Area. Specifically steam punk community is just a vibrant and amazing. It starts there and then I think about function and form and I throw in a little passion and love and end up with some pretty awesome stuff I think.
Fr. Robert: Now I really enjoyed that steam punk booth and I have been trying to get into it. If there are any Makers in the area, California or the bay area and you want to do it on Know How and you’ve got the skills to make something interesting, please go ahead and contact me on twitter @PadreSJ.
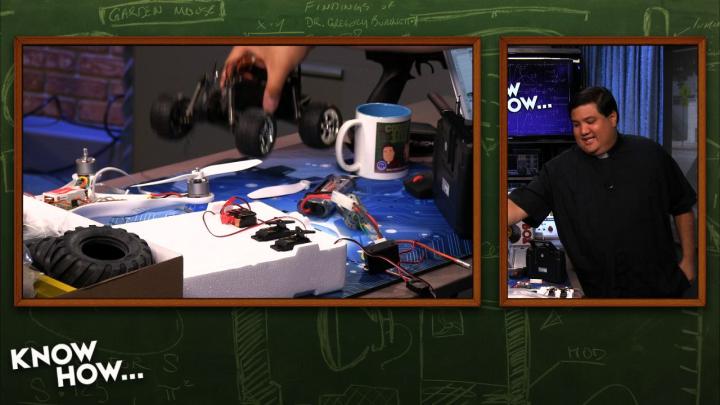
Fr. Robert: Now, remote control. For the older members of the audience, you probably dabbled with remote control. Everyone was doing it back in the 80s and 90s. It was fun to make models that move. It was one thing to make a fighter jet that sat on the wall or a nice model of a car that sat on a top of your bed. That to make a remote control plane, boat or car that was a different thing. Now you can buy yourself a kit. And some of these kids are actually pretty advanced. This is something that I received a couple of years back. I showed this off last year. It is actually a decent remote-controlled vehicle and it will show you all the principles. But the problem is that it is ready to run. It comes preassembled, which means that if you are doing this to learn a few things, to find out how remote control works and how transmissions are assembled, how the power plant is put together, this will be a really good way to do that. You can disassemble it, but what is the point of that. Instead, we thought you should probably buy yourself a kit. We have gone with this. This is the lunchbox, this is something that is from the 80s. It is an old model and we got it because it has a huge chassis which gives us a lot of opportunity to play with the different parts of the remote control fetish. Everything from the big monster truck wheels to an oversized transmission to a unibody which mounts everything. Now, what I really like about assembling a kit like this is you need to put it together. You don’t buy this from a store and turn it on the next day. If you don’t put together all the cures properly, if you cannot assemble a transmission, if you don’t know how a power plant runs, then you are just not going to get any enjoyment. So if you have a kid or you are a kid at heart, that is what we are going to be doing in the next couple of episodes. We are going to teach you how to turn this into something like this. Now again, last time we were here we talked a little bit about the actual transmitter. The transmitter and the receiver. The way that your RC system talks to the model. Now what we told you is that using crystals so that the transmitter and the receiver were on the same frequency you could transmit signals, instructions from your transmitter unit to your receiver unit. But the question is, what happens to those signals and those instructions once they get there. Specifically what we are going to cover today is how do you get go. We want to go. And if it doesn’t go, why are you doing it in the first place. So what we need to do is we need to talk about the power plant. That’s right, the little electric motors (you can buy these with nitro fuel but let’s do electric because again I don’t like people to blow themselves up) we want to show you the two different types of electric motors that you can get for your RC models.
Fr. Robert: Now specifically they are called brush and brushless. Now, I know we are going to get technical here but this is no doubt, we are all geniuses here so you will be able to figure this out very quickly and you understand why it is important to know one from the other. Now a brush motor is very simple. This is what a brush motor looks like. In its most basic form you have a battery, your power source, an armature which contains the shaft, a tightly wound coil of wire, a commutator and the assembly into which the Armature is mounted, which will contain the brushes, which you can see, a rotating mount which allows the Armature to spend on its axis, and a permanent magnet. You could actually build this. This is a perfect model of something that you could throw together in a garage and you would get rotational motion out of it. Now the way that it works is this. The battery provides current to the brushes. Now the brushes are going to make contact with the commutator and the commutator will allow the current to flow through the wire loop. Now the current flows through a loop of wire which will create a magnetic field. If you have ever done this in grade school, if you put current through a coil of copper cable it will create a positive and a negative pole. In other words it is electromagnetic. When you create that magnetic field, the magnetic field will interact with the magnetic field of the permanent magnet, which will also have a positive pole and a negative pole. Magnetism 101. Right poles will repel and opposite poles will attract. That means the positive side of the charge coil will be pushed away from the positive side of the permanent magnet and drawn to the negative side of the permanent magnet. At the same time, the negative side of the charge coil will be pushed away from the negative side of the permanent magnet and drawn to the positive side of the permanent magnet. Because of this, the shaft on which the coiled brass, because it is in a mount, will turn. However, if that is all it was then it would stop at 879°. It would turn one way until the polls were lined up, negative to positive on both sides. And then it would turn no more. Obviously 179° of motion isn’t really enough for us. We want to get constant motion. We want to get constant movement and constant power out of our motors. So, all electric motors depend on one important thing. The secret is the commutator. Now in a brush motor the commutator is the part of the Armature that is connected to the coil. That makes the electromagnetic field that connects to the brushes on the assembly. Now the commutator has two jobs. The first is to transfer power from a fixed point to the Armature. Imagine you have got a rotating assembly so obviously you can't just have a wire that brings current into the coil because eventually the wire would run out of link and it would spool around itself and break. So this allows you to have a fixed point, those two brushes that are transferring current into the coil through the commutator. However more importantly, the commutator reverses the polarity of the current flowing through the Armature. See how the red and the blue will periodically go from one brush to the other? Every time they go from one brush to the next, they will flip polarity. And every time they flipped Larry the will flip the magnetic field being generated by the coil. That means that every time you get close to having a static field it will flip to make it positive to positive, negative to negative and it continues on its way. You do this several thousand times a second and you have yourself an electric motor.
Fr. Robert: There you go folks, there is a brushed DC motor. Now brushed DC motors have a couple of advantages. The first is that they are actually pretty cheap. We have been making these things for over 150 years so we have kind of got the technology down. They are also very easy to control as far as speed is concerned because there is only one control. Power. You dumb were current into the motor and it goes faster, it is actually pretty simple. There is no voodoo, no electronic sensors, it is a simple electronic device. Put power in, get motion out. Also, you get really good low end torque. If you have ever driven an electric vehicle you know what it feels like to stomp on the accelerator and just feel it fly. That is because all of the torque of an electric motor is at the start of its turning. So at the very first, when it just first starts turning that is the most tort you will ever get out of that motor and then it drops off. Versus a gas motor where a power band hovers between three and 6000 RPM. So you have to speed up before you can actually get that low into power. Now that is a brushed motor. The disadvantages of using this is at the brushes, because they are touching the commutator, will eventually wear out. And when the brush is where route you either have to replace it or you throw away the motor. More likely the second, because these are so cheap. The second disadvantage is that there will be an electrical arc every time you switch the commutator. You remember that small moment where you flip polarities? When you do that, when the precious make contact with the next section of the commutator there is going to be a slight electrical arc. That electrical arc is actually going to cause a bit of spot weld on the commutator and it is also going to cause premature wear of the brushes. So although they are cheap, and although they are very easy to use they are not always the most reliable thing to have in your RC model. So, let’s go from this to this.
Fr. Robert: This is a brushless motor. Now mostly you have seen these in quad copters. Quiet copters use them a lot because the auto sensing that is inside the motor is actually perfect for the fine control that you need to balance a craft in flight. Now what do I mean by that? What I mean is that, most of the parts of a brushless motor are the same as a brush motor, you are going to have a coil of wire, and Armature, a permanent magnet, a commutator. The only real difference is A) the magnet is the part that spins, not the coil and B) the commutator is electrical it is not mechanical. Now what do I mean by that? There is a power source, an Armature, a shaft, a coil that generates the electric field, there is a permanent magnet, there is a commutator that flips the current going to the coil and therefore flips the magnetic field, but the shaft the part that spends is actually connected not to that little coil that we saw in the first diagram but rather to the magnet. So if you look at this animation imagine that the magnet is the part that is rotating. That is actually perfectly possible because right here the only reason why the madman is not rotating is because it is being held down by the mount. If we do the exact same process but we don't move the Armature, we don’t move the coil you get movement from the amendment and that is what makes a brushed motor. Now the other part is that because there is no mechanical commutator, it means that you have to use a sensor. There is a sensor inside every brushed motor that detects the position of the magnet. And then it automatically will shift the magnetic field, the polarity of the current flowing to the coil to make that magnet continue to spend on the axis. What this means is that in a brushless motor intends to be a bit more expensive. Not a whole lot because they are manufactured in bulk but the nice ones that you can get from remote-controlled aircraft, whereas this one might cost you about $14, this one will probably cost you about $60. There is a price increase, so just know about that. However there is a lot of advantages to using a brushless motor. The first is that because there are no brushes, there is no contact and you don’t have to worry about brushes wearing out. So they are going to last a lot longer. Also, because the commutation is done electronically rather than mechanically you don’t have to worry about that arc effect, which again means that your motor is going to last longer. They do tend to be a bit more expensive and they are slightly more fragile, so just keep that in the back of your mind. All right, that is all the theory. Theory is great, now we want to see it in action. How does this work?
Fr. Robert: I am going to show you exactly how this works. So I’ve got a few different types of models here. I’ve got the quad copter which we kind of redid it. It will fly again. I swear it will fly again, even though I kind of ripped one of the motors out. This is our standard little remote control model. If you notice, I've got my remote control here and if I turn this will it will turn the steering servo which will allow the wheels to move in one direction or the next. We have also got a throttle. The throttle is controlled by the Little thumb grip so that if I pull this it is going to slowly make it go forward, back, or brake. The way that it works, as we explained yesterday, is that it has a transmitter and a receiver that receives instructions and allows me to transmit levels from the remote to the receiver. Now, how does that actually work in practice? Now that I know it will work, how can I make it work on my model? Simple. I use something like this. When I have a power plan, every power plan on every good remote-control vehicle is going to start with the battery. This is a 3800 ML lithium battery. 7.2 V is sort of the standard for remote control models. You can go 8.4, in fact I have gone 8.4. The model them I am going to be building to race against Brian, don't tell him, I am going to make him use a 7.2 and I’m going to use an 8.4. That is a secret just between you and me. That is where my power is going to come from. When I induce current in my electric motor, when I create the field, the power to make that filled is coming from here. Now, we go from there to this.
Fr. Robert: This little device is called the ESC. An electronic speed control. The idea is that instead of a servo, in the old remote control models you had a servo like this that was connected to a little plate and as the servo moved back-and-forth, it would make a brush move across the plate and the plate was connected to a resistor so that would determine how much power actually made it to the engine. They have done away with that because it was funky and dangerous and made a lot of people get burned. And instead, they have created this solid-state device. This receives the signal from your transmitter, which is right here. And it turns it into a signal that let the electronic speed controller know how much power it is going to deliver to your motor. Of course we’ve got the receiver, the receiver is right here. This one is actually tied to this transmitter and it works exactly the same way as the one that was in here. In fact, I could switch these and I could drive the servos in the motors with either one of these controllers. Now this controller is interesting. Because, if you look at it this controller is actually has three leads like that, which means that it was designed for a brushless motor. It was designed for one of these. So remember, brushless motors need the sensing capability. You have a sensor that tells you exactly where the shaft is and then you get in time. We are not using a brushless motor, we are using a brushed motor. This controller has the ability to use brushed motors by just using two of the leads and by switching the set up on the controller. Not all ESCs have that. Make sure you look at the instructions very closely before you buy. If you are going on Amazon to get yourself a controller, make sure you buy a controller that is either for a brushless or for a brushed motor, depending on which one you plan to buy.
Fr. Robert: All right, now. I’ve got my receiver, my controller, my motor. All I need to do is get it power and make sure that I haven’t done anything that will electrocute me. I will turn on my transmitter and I will connect it to my 7.2 V battery like so. Once I turn it on, remember I need two channels. One that will control the steering and a second channel that will control the throttle. If I turn on the transmitter and the receiver you will see the servo has I move back and forth the servo will shift back and forth. This is going to be the one that is connected to the linkage of the lunchbox. This will allow me to steer back and forth. You can buy bigger servos, the bigger the servo the more force it will be able to put out as you make your signal input. But this is just about right for using a little bit of Archimedes and leverage to move the wheels even on something as big as a lunchbox. Here is the really cool part. The throttle, this thing right here, is not connected to a servo it is connected to this electronic speed controller, which means when I start turning this it actually gives you very fine control. You can buy different size motors. This is a standard 540 but you can get anything from a 380 which is a much smaller motor all the way up. You can also custom torque your motor. I remember growing up with models it used to be there was a really good way to fine tune your engines so that you could use the exact same model as everybody else and get a little more power.
Fr. Robert: Now this, folks, is what your basic power plant is going to look like. If you are building a model, you need to think about this. Because one of the biggest Mistakes people will make in building a model is that the transmitter and the power train are an afterthought. It is just something that they ran to the store because they forgot to get a transmitter, or we forgot to get electronic speed control or we don't have a motor in the kit so let’s just go buy the cheapest one we have. You can spend as much or as little as you want on the transmitter, but it gets to be a choice you make. More expensive transmitters will have more channels. More channels means you can do more things. For example, one of the models I created early on was a four channel model, one was for steering, one was for throttle, one was to aim the cannon on top of the car, and Channel 4 was to fire. So I am not saying that you make yourself a Canon car, but you could. Now when we come back next time we are actually going to start to show you how you assemble a model car. We are going to take you through step-by-step on what it takes to put a kit like this with all this power plant equipment into a real live working model.
Fr. Robert: Until that time though I am Father Robert Ballecer and I want to thank you for watching Know-How. Even if we’re a Cranky Hippo-less episode of Know How. If you want to find out about anything we talked about today, from hydrogen cells to what you need to update your NAS box, to everything about RC power plants. Be sure to drop by our show notes. You can find is that twit.tv/KH where you will find each and every episode of the show along with what I think are some of the best show notes that are in the business. On that page you are also going to find a way to follow Wes if you want to automatically subscribe so that you get no how downloaded to your device of choice. If you want on your iPad, your iPhone, your android phone or tablet, your laptop, your desktop, we do it all for you because we love you. Because the show is for you. You can also email us at knowhow@twit.tv but we forwarded tat email to Jeff Needles, so send us as much email to him as possible. He won’t read it but it will be funny to watch him complain every single week. Also you can follow us on Google Plus if you go to gplus.to/twitkh you’ll find our GPlus community. It is 6600 members and growing. It is a fantastic place to ask questions or to give advice to young builders, makers and DIYers. Also you can find me on Twitter at twitter.com/PadreSJ that is @PadreSJ. If you follow me you will find out not only what we are going to be doing on every episode of Know How but you’ll be able to suggest ideas for future episodes of Know How and you’ll find out what I do during the week moving between Know How, Coding 101 and This Week at Enterprise Tech, here on the Twit TV network. Until next time, now that you know how, go do it!